Adenium Obesum - A journey  1. Seed set
1.1 Wait until the seed pod dries out and starts to crack open before removing from plant
1.2 Remove seeds from pod taking care to collect the dandelion-like fluffy bits or they will go EVERYWHERE. I average about 200 seeds per pod and 1-2 bags of fluffly stuff in total!
1.3 Store as you would other seeds - cool dark dry
Here you can see the two pods on the plant, note that it is drying out and almost ready to collect seed from.

READY! Pods have cracked
 2. Germination:
 (Seeds are readily available in a host of varieties!!)
2.1 Soak seeds in water over night, I use a ziplock bag half fill it with water, dump seeds in then seal it up. Seeds will swell overnight and be ready for planting the following day at your convenience.
2.2. Prepare well-draining seedling mix or cactus mix (preference given to small particle size and draining ability of substrate) generally a mix high in sand and low in large organic matter works well. I like to use seedling trays or tubestock pots but that is merely because I have them, you can use whatever you have onhand.
2.3. Make a small impression with your finger to place the seed horizontally in the impression. Lightly cover with your seedling mix. Note that the impression is shallow (0.5cm?) and not enough to overly compact the mix under the seed. Seed is placed horizontally because they sprout from one end and if the seed is upside down it can cause problems/death, if your mix is light enough it may not be a problem but it’s easier to just put them in roughly horizontal. Lightly water in, after a few days the sprouted seeds will stand on end and eventually work their way out of the seed casing and wallah! You have a brand new baby adenium
 3. Care:
3.1 Treat them like a cactus, don’t over water, allow the substrate to dry in-between watering. Most deaths I have seen have been due to over watering causing the plant to rot.
3.2 Fertilise with a slow release pellet like osmocote or your preferred cactus fertiliser.
3.3 Ideally keep them out of the rain in the wet season (I live in sub-tropics so I don’t know how they fair in ice/snow, but they do drop their leaves when it gets cold here ~10’C). I have lost a number of mature plants due to not being able to move them out of the weather >3 days saturation and you will start having problems.
4. Repotting:4.1 Always use well-draining potting mix, (slightly less important if you can control watering cycle or have mature plants)
4.2 When repotting always raise the plant up in the mix. In my experience, rot can set in if you cover the trunk where it was previously exposed. Doing this is also how the awesome root structure is achieved on the plants that you see on the interwebs.
4.3 Before/after Pictured
My pictures don't show it very well

I swear I tried to show the soil level in both photos....
I have removed the plant from pot and added ~3cm new soil to the bottom of the pot then placed the plant back in the pot. Loosely filling in the top with fresh potting mix. After a water the plant is roughly 2cm higher in the pot than it was before.
I err on the side of caution by not removing soil from around what will be newly exposed roots. Any soil above the new soil level will fall out naturally overtime with watering, this probably also gives the roots time to harden rather than die off. Realistically I should have repotted into a bigger pot but they don't seem to mind being rootbound. You could do this twice or more a year, but I'm lazy!! I'm fairly confident that the original soil level on this plant was where the two top most roots cross over, there is a slight color difference in the trunk?
 5. Pruning:
5.1 Adeniums can be pruned but care should be taken that the fresh cut area is not exposed to continual rain/watering until healed (or at all! See above). Also note that I have used prunings as cuttings and they have taken, but so far they seem to lack the thick base of a seeded plant. This may develop over-time…? /shrug without the base they look kind of sad so I probably won’t bother in the future…
5.2 Pruning promotes new growth either directly below the cut or from further down on the trunk. It is difficult to predict where new sprouts will appear as they don't seem to have nodes anywhere??
5.3 I have quite a few plants that are a single stem and will be pruned back hard to the top of the trunk once they have flowered. (for my convenience more than anything else as I need color identification for my grafting plan)
This is a plant I pruned back ~2yrs ago that had only the main stem and no branches, it is ugly and needs further attention... (note that terracotta pots are awesome for these guys!)

5.4 When pruning it would be ideal to wait until you have other stock to graft onto the pruned cut! Kill 2 birds....
6. Grafting: (research needed here!!)
6.1 Of my limited number of attempts so far, I’ve had better success by cutting a V in both parts and taping together (traditional graft?).
I recently tried using a grafting tool that sort of "jigsaw pieces" the two parts together but found that the graft bends due to the succulent nature of the plant… I’m not sure if they will take yet, I have considered providing additional support to the graft by using icecream sticks (or similar) taped to the graft area but haven’t done so yet… to be continued….
The end game: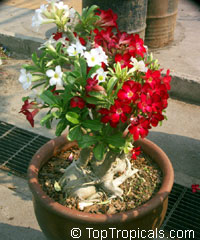
Please note, this is all just my experience, I’m just a dude trying to make plants grow so I can graft them all together and have awesome multi-coloured flowers on the same plant. If this is also your goal make sure you label the color of each plant as it flowers (AND WHEN U REPOT IT) to save yourself having to wait until the next time the plant flowers.
I’ve had heaps of failures!
Mostly due to inadequate drainage or over-watering, hopefully the above will save others some wasted time/seeds.
Any questions or advice most welcome!!There seems to be alot more information on the web now, than there was when I first started. I will update this post as I find better ways of doing things.
It's taken me ~3 years to obtain/grow 30 odd different color plants to maturity ready for grafting, perhaps I should fertilise more?


 Author
Topic: Desert Rose ~ Adenium obesum (Read 29696 times)
Author
Topic: Desert Rose ~ Adenium obesum (Read 29696 times)